Showing posts with label Stereoscopic. Show all posts

Jun 1, 2010

Stereo Photography Track - quick and dirty

 Some time ago I stumbled (again) over some stereo pictures. This time I had to build my  own simple rig. I am not going in depth of the principles of stereo or 3D photography; there are many and very detailed web pages about this subject. I rather show a solution that practically everyone can build by her(him)self  (At least with the help of a good friend).

In the last step you find a few pictures for 'cross-eyed' and 'parallel' viewing.
A little guide to 3D viewing you find HERE

Find the Materials

Question was, how do I move my camera 2.5" or ~6.5cm in either direction. Somehow it has to slide to the left and right. Alright, you need a 'track' and you need a carrier for the camera.
I sifted through all the stuff in my basement and found this steel track, maybe once used for a sliding door. Also a nice piece of hardwood where a cutoff piece of this track would ride on.

Find the Materials

Cut the Track

The wood was 1" thick. With a bit of sanding it would fit nicely into the metal piece. I drew up a sketch and run over to my friend, an experience wood worker. A few cuts on the table-saw later I had a nice track my metal carrier could ride on.
Cut the Track
stereo track02_01.JPGstereo track02_02.JPG

Build the Camera Carrier

The mounting hole at the bottom of a camera is made to accept a 1/4" - 20 screw. Back in my basement I drilled a 1/4" hole in the middle of the metal piece, inserted a 1/2" long screw and secured it with a nut. There was enough thread sticking out to screw the camera on.
Build the Camera Carrier
stereo track03_01.JPGstereo track03_02.JPG

The Job Done

All in all it didn't take me longer than 2 hours and to be honest, the assembly was a bit wobbly first. I inserted some Styrene shims and now the whole contraption slides smoothly back and forth , or rather right (first picture) to left (second picture).
I hope at least some of you can enjoy my first stereo pictures I took this evening in my yard.
The first 5 pictures are for 'cross-eyed' viewing, the rest are for people who find it easier to use 'parallel' viewing.

bubble blowing
© 2005 Lord V

Yokohama Art
© 2006 JohnKit


May 31, 2010

How to see 3D photos

Note: This technique will be impossible for some people. If you have poor eye control, a dramatic disparity in eye function or anything along those lines, you may not be able to see the 3D effect no matter how much you practice.
Now that we’ve cleared that up, lets learn how to see in 3D!

Stereo Pairs


To see a 3D image, each eye needs to see a different view. There are ways to take photos like this, but I’ll talk about that another time. When the two slightly different images are processed, they are placed side-by-side so that the viewer can use a special “crossed-eye” technique to overlap them, and see both views together in 3D.
Below is an animation that simulates what it looks like when you view these images in 3D. The instructions follow.


How to do it

      Why crossed eyes? When overlapping stereo pairs without special glasses, you can get the 3D effect by crossing your eyes or diverging your eyes. I prefer the crossed eye method. I find it easier to control, and it is possible to view larger 3D images than with the diverging technique.
  • Sit square in front of your monitor, with the image directly in front of you, at about arm’s length
  • Sitting further back makes it easier – you don’t need to cross your eyes as much – but makes the image look smaller
  • Make sure you keep your head level horizontally, tilting your head will prevent you from merging the images
  • While keeping the stereo pair of images in the centre of your vision, slowly cross your eyes
  • The stereo pair will go out of focus and you will seem to see four images, as shown in the animation above
  • If you find it hard to cross your eyes, it can help to hold a pen in front of you and look at the tip with the stereo pair in the background
  • Gradually cross your eyes more and more – if using a pen to assist, start it close to the monitor and move it towards your nose
  • Continue crossing your eyes more, untill the centre two of the four images overlap and you see three blurry images, as in the animation above
  • Try and hold the centre image together – it is possible to “lock” it in place and see it as one image
  • The “locked” centre image should appear in 3D!
  • Now the tricky part, focus – while holding the 3D image in place, relax your eyes – drop the pen from your field of view if you are using it
  • If you can keep the 3D image locked and relax your eyes, it should eventually pop into focus, as in the last frame of the animation above
What you are doing here is causing your eyes to look at a space between you and the monitor, but focusing the lenses on the monitor. Our eyes never naturally need to do this, so it can be tricky to do at first.

Try it!


Try and see the 3D effect yourself with the stereo pair below.
How did you go? If you were able to see the effect, congratulations! It really is very striking isn’t it? If you couldn’t manage to do it after trying for a while, leave it aside and try again tomorrow. It can be tricky to get the first time, but the majority of people can do it. If you find you are unable to see the 3D effect no matter how many times you try, then it may be that you are one of the few who for whatever reason will never be able to do it. I have no idea why, some people can’t curl their tongues! *shrug*

May 1, 2010

Stereo Photography Track - quick and dirty

 Some time ago I stumbled (again) over some stereo pictures. This time I had to build my  own simple rig. I am not going in depth of the principles of stereo or 3D photography; there are many and very detailed web pages about this subject. I rather show a solution that practically everyone can build by her(him)self  (At least with the help of a good friend).


In the last step you find a few pictures for 'cross-eyed' and 'parallel' viewing.
A little guide to 3D viewing you find HERE

Find the Materials

Question was, how do I move my camera 2.5" or ~6.5cm in either direction. Somehow it has to slide to the left and right. Alright, you need a 'track' and you need a carrier for the camera.
I sifted through all the stuff in my basement and found this steel track, maybe once used for a sliding door. Also a nice piece of hardwood where a cutoff piece of this track would ride on.

Find the Materials

Cut the Track

The wood was 1" thick. With a bit of sanding it would fit nicely into the metal piece. I drew up a sketch and run over to my friend, an experience wood worker. A few cuts on the table-saw later I had a nice track my metal carrier could ride on.
Cut the Track
loading...
i
stereo track02_01.JPGstereo track02_02.JPG

Build the Camera Carrier

The mounting hole at the bottom of a camera is made to accept a 1/4" - 20 screw. Back in my basement I drilled a 1/4" hole in the middle of the metal piece, inserted a 1/2" long screw and secured it with a nut. There was enough thread sticking out to screw the camera on.
Build the Camera Carrier
loading...
i
stereo track03_01.JPGstereo track03_02.JPG

The Job Done

All in all it didn't take me longer than 2 hours and to be honest, the assembly was a bit wobbly first. I inserted some Styrene shims and now the whole contraption slides smoothly back and forth , or rather right (first picture) to left (second picture).
I hope at least some of you can enjoy my first stereo pictures I took this evening in my yard.
The first 5 pictures are for 'cross-eyed' viewing, the rest are for people who find it easier to use 'parallel' viewing.
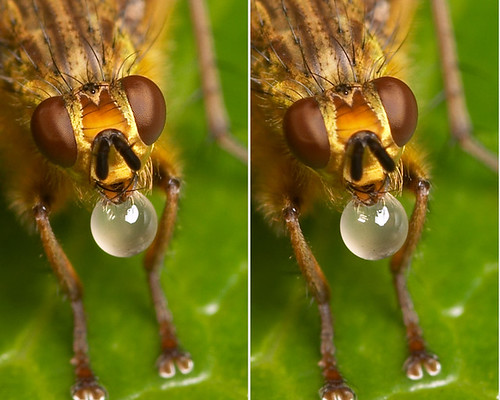
bubble blowing
© 2005 Lord V


Followers

Links

Submit your website to 20 Search Engines - FREE with ineedhits! Technology Top Blogs Bloglisting.net - The internets fastest growing blog directory Technology blogs Free web directory Technology and Web 2.0 Blogs Technology Blogs - Blog Rankings Free Link Exchange
TAMAZU: Computers Blogs

Map IP Address
Powered byIP2Location.com

Wish™ Blog Copyright © 2009 DarkfolioZ is Designed by Bie Blogger Template for Ipietoon